First off, now that the boat is upright, I made Hazel a ramp so she can go in and out of the boat while Im working.
Next, I put the front deck on. There are probably things I need to do under there that would be easier without the deck, but my excitement trumps good planning. I know I still need to bolt in the motor well/mount, so the back deck stays off for now.
If you are following this blog, youve read through the stressful process of using epoxy resin to adhere the boat members together, so Ill skip the narrative blow by blow. Just remember, dealing with epoxy is like defusing a ticking time bomb.
So having our first deck on the boat allows Hazel and I to enjoy a much deserved sunny lay-about.
Boats can be and are regularly built using an existing design. This is a cost effective way to obtain plans for a proven boat. Click here for an example project. To build a boat from one of our existing plan sets a royalty must be paid. Please contact us for a quote.
In many cases existing plans are modified or updated. For example a classic sailing yacht originally designed and built using carvel planking will often be re-engineered and updated for cold molded epoxy construction. Another common example may be modifying an interior arrangement to suit ones particular needs. Please contact us for further information.
Its that time of year again. Spring Tweak time! This years Spring Tweak is a DIY tiller lock.
This tiller lock is fully adjustable, easy to make, unobtrusive, easily removed and set up, and only costs a few bucks to make. Ill show you how to make one.
Tiller Locks:
When it comes to tiller locking devices, theres certainly no shortage of them. Do a Google search for "tiller tamer", or "tiller lock" or something similar, and before you know it youll have spent your entire day looking at a bewildering assortment of different types, both commercially available and home made. Dont ask me how I know that.
Tiller locks generally fall into four main categories.
First, youve got your on-off lever action type, like this TillerClutch for example. These usually have a lever mounted towards the front of the tiller that allows you to alternate between locking the tiller in place, or allowing it to move freely. Its always locked or unlocked, theres no in-between.
Then theres the Solid Brace type. These consist of an adjustable rod that goes from the tiller to a box usually mounted on the seat back. Theyre designed to be rugged. The rod doubles as a tiller extender and can be easily detached to unlock the tiller. The rods length can be adjusted as needed.
Next, theres the Friction Knob type, like the ever popular Tiller Tamer. Here, a knob is used to adjust the amount of friction anywhere from very loose to a full lock.
Also using adjustable friction technology are a variety of DIY Shock Cord, Rope and Bungee types. These are usually home-made and can range from a single piece of rope stretched between two cleats, to devices constructed from bungee cords, fairleads, camcleats, blocks, hooks, and various other items.
Of course they all have their pros and cons. So how do you decide which one to buy or build?
What makes a good tiller lock (in my opinion):
Adjustability means flexability. I favor the devices that allow the friction to be adjusted from completely free tiller movement all the way up to a full lock. Dialing in just enough friction to hold the tiller in place still allows an occasional nudge to adjust the boats course.
Dont get in the way. Most devices have ropes that lead from the front of the tiller to the sides of the boat that block access to outboard motors, block seats, and so on. This can be a major drawback on a boat with limited space to begin with.
Quickly disabled and enabled. I want to be able to quickly and easily disable or remove the device when Im done using it, or in case of an emergency.
A DIY solution, inexpensive and easily constructed from readily available parts.
Strong, reliable, and should not be unattractive.
How my tiller lock works:
My tiller lock is a Friction Knob type. Tightening the knob pulls up on an eye-bolt, pinching a line against a strip of leather with increasing friction. The amount of friction is fully adjustable from very loose to a full lock. The friction between the rope and leather is smooth, consistant, and the leather will not wear out any time soon. It is not necessary to locate the tiller lock near the front of the tiller on a boat the size of mine, or on any boat with a well balanced helm. I located mine slightly forward of my aft coaming and ran the line almost straight across. There, the line is not blocking my way at all but still functions perfectly, so long as I keep the line free of slack. Two jam cleats on my coaming allow me to easily tension the line tightly. I can instantly remove the device by pulling the line off the jam cleats. A leather washer under the knob protects the tiller from damage and its friction prevents the knob from turning on its own.
Materials needed:
To make my tiller lock youll need a stainless steel eye-bolt and a few other small items that you can probably find lying around the house or garage. The eye-bolt I used is a Stanley V2161 that I got from Lowes for $1.28. Youll also need a small scrap of leather, a couple stainless steel screws, a short piece of rope, and a couple small scraps of wood. You may also need to purchase a couple small jam cleats. The knob can be made from a scrap of wood by tapping a threaded hole in it or using a threaded insert, or you can buy a threaded plastic knob at a hardware store for $2.60 like I did. Or simply use a stainless steel wingnut.
Building the tiller lock:
The lock is very simple and building it should be quite self-explanitory. Here is a cutaway diagram of how it goes together:
Youll need to drill a 1/4" hole through your tiller for the eye-bolt.
Make the bottom piece from a scrap of wood measuring 2-1/2" long by 1" high by 3/4" thick. I used white oak. Cut a 1/4" slot completely through it, long enough for the eye-bolt to fit through, and counterbore a couple of screw holes in it. Round off the corners.
Cut a strip of leather as wide as the inside diameter of the eye-bolt and long enough to wrap around the wooden piece. Leather from an old belt works fine. Insert the eye-bolt, then add the leather strip, holding it in place with glue or a couple brass tacks. Make a leather washer for under the knob. Drill the hole in the leather washer oversized so the eye-bolt can freely move up and down through it.
Of course we are talking, once again, about the pretty little double-ender from the pen of Iain Oughtred.
Tim Haney, from St Augustine, Florida, who describes himself variously as a professional boat carpenter and a dyed-in-the-wool boat nut, sent me some photos of a beautiful Tern he built last winter.
"Hi Doryman, Here are some pictures of my Arctic Tern sailing on Salt Run in St.Augustine a couple of weeks ago. I can’t say enough good things about it. The plans are excellent and if followed closely you can’t go wrong . A long boat is no more difficult than a short one to build and the difference in cost is minimal, however, the rewards are huge."
"I finished the Arctic Tern last February, so have had plenty of time to learn the boat. Its pretty much a solo rig which is fine because thats how it seems I do most of my sailing. The sail is also made in my shop. Im proud of my first effort."
"The cloth came from Duckworks and I consulted The Sailmakers Apprentice."
Tim is interested in networking with local sailors and we wish him luck with that.
He has one last word of advice for those who have dreamed of building their own boat...
"If any of you are sitting on the fence, all I can say is get going and make some sawdust."
"See you on the water!" Tim Haney
Could happen... its cold, wet and drear here in the Pacific Northwest right now and all that warm sun looks really good! Maybe Tim would let me sail his new boat..........
About four years ago (where did all the time go?) we heard of an Eun na Mara, that fine little cruiser from the board of Iain Oughtred, being launched in Venice, Italy. Then as now I am smitten by this design and have often dreamed of building one for myself. I know I say that often and its always true. But if I could build only one boat in my lifetime, this could well be it.
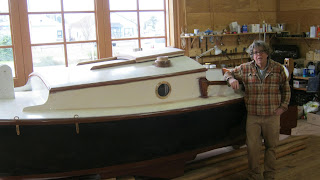
With this in mind, you might imagine how pleased I am to see an Eun na Mara nearing completion right here in the Pacific Northwest. David Jones, of Port Townsend, Washington is building his version at the Northwest Maritime Center, with help from the staff at that fine institution.
David has been working on his boat project for a couple years and Ive heard about it from friends, but just recently contacted him to ask about his progress. It seems he is nearing completion and hopes to launch her in late spring:
"Hi Michael,
I have visited your excellent doryman blog and have enjoyed it!
By May we should be in the water or very nearly so. Im working 6 days a week full-time to keep this project progressing, and it is moving along on schedule. Im now varnishing exterior parts, so I can mask and paint the topside. The spars now being varnished as well. Lots of labor, but I really enjoy working with the friends at the Northwest Maritime Center. Thanks for your interest, and well go sailing together when shes wet. Best regards,
David Jones"
A chance to go sailing in a beautiful new Eun na Mara on the transcendent waters of Admiralty Inlet is an offer I cant pass up!
David and friends. (Looks like a whiskey plank party.)
Fresh varnish and paint.
Nice shop area!
A well thought out design, artfully executed.
The proud owner. Very nice job, David.
The first two photos courtesy of Brandon Ford. The remainder by permission of David Jones.


 First, youve got your on-off lever action type, like this TillerClutch for example. These usually have a lever mounted towards the front of the tiller that allows you to alternate between locking the tiller in place, or allowing it to move freely. Its always locked or unlocked, theres no in-between.
  Then theres the Solid Brace type. These consist of an adjustable rod that goes from the tiller to a box usually mounted on the seat back. Theyre designed to be rugged. The rod doubles as a tiller extender and can be easily detached to unlock the tiller. The rods length can be adjusted as needed.
 Also using adjustable friction technology are a variety of DIY Shock Cord, Rope and Bungee types. These are usually home-made and can range from a single piece of rope stretched between two cleats, to devices constructed from bungee cords, fairleads, camcleats, blocks, hooks, and various other items.