Before I could begin assembling the boat, or even building the larger parts, I had to take some time off and remodel the shop. When I bought our house, the previous owner had 10 kids. To obtain more bedrooms, the owner divided the original 2-car garage in half, turning it into a 1-car garage and 2 additional bedrooms. Now I needed the shop space, and, since my kids have all grown up, I had no need for two extra bedrooms. So out came the crowbars and sledgehammers. Now, at long last, my shop looks like this:

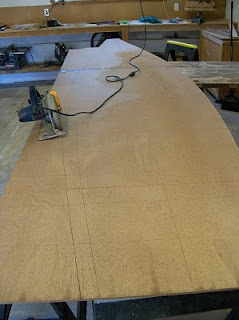
After working in a 10 x 20 shop for all these years, a 20 x 20 shop feels enormous! The Navigator lower panel sitting on the sawhorses seems almost lost, where before it would be difficult simply to walk around it.
Now that I have the space, I have been able to work at a much faster pace.
The lower panel has been scarfed and cut out.
 The keel batten, made of recycled mahogany, was installed, as were the seat front stringers. Note that I chose to end the seat front stringers at bulkhead 5. I asked the designer, John Welsford, and he gave this the O.K. There is no need for them to continue forward of B5 and they are uncomfortable to step on.

Next came installing the centerboard case, which I built many months ago. It fit perfectly on the first try. I was glad that I built the centerboard and centerboard case together so that I could ensure that everything fit and operated properly before installing them in the boat. The interior of the case and the centerboard were both fiberglassed. I was able to carefully control the amount of gap between the board and case. I was able to drill the pivot hole perfectly aligned by using the Shopsmith in drill press mode. These things would have been much more difficult to do if I had built the centerboard later on.

I used the Shopsmith in Horizontal Boring mode to drill the tow eye hole through the stem.

Installed the stem and bulkheads 1, 2 and 3.

Followed by bulkheads 4, 5, 6, 7, 8 and the seat fronts. This is the most exciting part so far about building the Navigator. Its amazing how quickly the boat goes from a collection of bulkheads to something that really resembles a boat at this stage!

Next, on goes the transom


The next step is adding the stringers, but once the stringers are on it will be more difficult to reach the center of the boat. I decided this would be a good time to install the mast step, and to put a coat or two of epoxy on.
After coating with epoxy, the surface gets very rough as the epoxy raises the grain. The best tool by far for smoothing epoxy is a cabinet scraper. It is much, much faster than sandpaper and doesnt put clouds of toxic epoxy dust into the air. I got mine at Sears, but Duckworks carries them here.

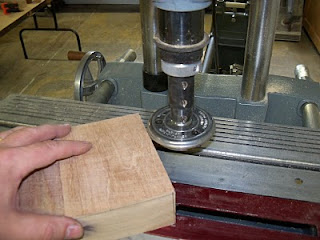
To make the mast steps, I glued up a big block of mahogany, squared it up on the tablesaw, planed it to the proper thickness using the handy Safe-T-Planer.
 Cut the center hole and drain hole. I lined the interior of the square hole with several layers of fiberglass and epoxy for wear protection. Before installing the step, I put a layer of fiberglass between the mast step and keel batten, again for wear protection. Then epoxied it in place and ran 4 stainless steel screws up through the lower panel, keel batten, and into the step from below.

Read More..
After working in a 10 x 20 shop for all these years, a 20 x 20 shop feels enormous! The Navigator lower panel sitting on the sawhorses seems almost lost, where before it would be difficult simply to walk around it.
Now that I have the space, I have been able to work at a much faster pace.
The lower panel has been scarfed and cut out.
Next came installing the centerboard case, which I built many months ago. It fit perfectly on the first try. I was glad that I built the centerboard and centerboard case together so that I could ensure that everything fit and operated properly before installing them in the boat. The interior of the case and the centerboard were both fiberglassed. I was able to carefully control the amount of gap between the board and case. I was able to drill the pivot hole perfectly aligned by using the Shopsmith in drill press mode. These things would have been much more difficult to do if I had built the centerboard later on.
I used the Shopsmith in Horizontal Boring mode to drill the tow eye hole through the stem.
Installed the stem and bulkheads 1, 2 and 3.
Followed by bulkheads 4, 5, 6, 7, 8 and the seat fronts. This is the most exciting part so far about building the Navigator. Its amazing how quickly the boat goes from a collection of bulkheads to something that really resembles a boat at this stage!
Next, on goes the transom
The next step is adding the stringers, but once the stringers are on it will be more difficult to reach the center of the boat. I decided this would be a good time to install the mast step, and to put a coat or two of epoxy on.
After coating with epoxy, the surface gets very rough as the epoxy raises the grain. The best tool by far for smoothing epoxy is a cabinet scraper. It is much, much faster than sandpaper and doesnt put clouds of toxic epoxy dust into the air. I got mine at Sears, but Duckworks carries them here.
To make the mast steps, I glued up a big block of mahogany, squared it up on the tablesaw, planed it to the proper thickness using the handy Safe-T-Planer.


